Both for my daily work as an IT Solution Engineer and for my personal projects, such as writing for my websites and writing my book, I use various productivity applications that help me better plan and monitor my work. I am a real fan of productivity solutions, like To Do and Kanban applications. These types of applications help you collect new ideas for projects, remember new activities, prioritize activities, plan activities, and monitor progress. For my personal activities, I have been using the Zenkit Suite for years, which seamlessly integrates a number of productivity solutions, such as Kanban, project management and to do. In this article, as part of my Zenkit Basics Series, I want to explain how to start using Zenkit To Do to support your productive life.
Note: This article contains affiliate links. At no additional cost to you, this website will earn a small commission if you choose to click through and make a purchase via the linked website. For more information see the Affiliate Disclaimer.
Content of the article
- My productivity system in short
- What is GTD (Getting Things Done)
- What is BASB (Building A Second Brain)
- What is Scrum
- How I integrate Zenkit To Do into my personal productivity system
- What is Zenkit
- What has Zenkit To Do to offer
- The basics
- Creating tasks
- Organizing tasks in Lists
- Working with tasks
- Settings
- How to download and install Zenkit To Do
My productivity system in short
Before we start diving into Zenkit To Do, I like to give a little background on how Zenkit To Do and other productivity apps fit into my personal productivity system. People around me are often under the impression that I have a very hectic life because they see that I am doing multiple creative things next to my busy daytime job, like writing for my two websites, realappuser.com and reallinuxuser.com, and publishing my book on Linux. But it is how you deal with it whether you experience all of this as hectic or too much to handle. If you approach your tasks, projects, knowledge, plans, and ideas a bit more smartly, you feel less overwhelmed and out of control. With the right approach, tools, and integrations, you can do more in the same amount of time, or do the same in less time.
In my recent article “How BASB, GTD, and Scrum help me to manage my productive life“, I talk about how I manage the creation, recording, planning, and execution of internal and external triggers, and how I go from these raw triggers to refined ideas, projects, tasks, and knowledge to keep. And such a standard system works well for me in all situations, regardless of the type of idea, task, and expected result. Zenkit To Do is one of the applications that I use on a daily basis in my productivity system.
How BASB, GTD, and Scrum help me to manage my productive life
In short, my personal productivity system, which I call CIDER, is mainly based on and inspired by three well-known methodologies or frameworks:
- GTD (Getting Things Done / David Allen)
- BASB (Building A Second Brain / Tiago Forte)
- Scrum
What is GTD (Getting Things Done)
GTD is a worldwide known and widely appreciated methodology of productivity expert David Allen. He describes this generic productivity method in his best-seller book “Getting Things Done”, which you can find via the image below (Affiliate Disclaimer).

According to David Allen, it is very important to directly bring over your ideas, things to do, things that resonate, etc, to some kind of temporary storage, so you can directly forget them, and come back to them later at a more convenient moment to organize, prioritize and plan them into actionable and non-actionable items. GTD is based on 5 steps: Capture, Clarify, Organize, Reflect, and Engage.
What is BASB (Building A Second Brain)
Whereas GTD is more focused on organizing, managing, and finalizing your tasks and projects, the BASB methodology goes further and is a personal knowledge management system designed to set up a dynamic and interrelated administration of notes of everything you need and want to remember in such a way that it simplifies your current and future creative and productive life, and empties your first brain. BASB is based on 4 basic steps: Capture, Organize, Distill, and Express.
Tiago Forte shares his BASB methodology via his YouTube channel, website, course, podcast, and his excellent book “Building a Second Brain: A Proven Method to Organize Your Digital Life and Unlock Your Creative Potential”, which you can find via the image below (Affiliate Disclaimer).
What is Scrum
Scrum is a framework that helps to come to an end product in an incremental, iterative way. Scrum helps to break down work into manageable small chunks, refine them, estimate effort, assign them to a specific sprint, execute them, monitor progress, and review. Scrum is based on intermediate feedback loops, which enhances the learning effect and makes it possible to adapt where required. In Scrum, there are five main events, the Sprint, the Sprint Planning, the Daily Scrum, the Sprint Review, and the Sprint Retrospective. In Scrum, there are also three important artifacts: the Product Backlog, the Sprint Backlog, and the Increments.
How I integrate Zenkit To Do into my personal productivity system
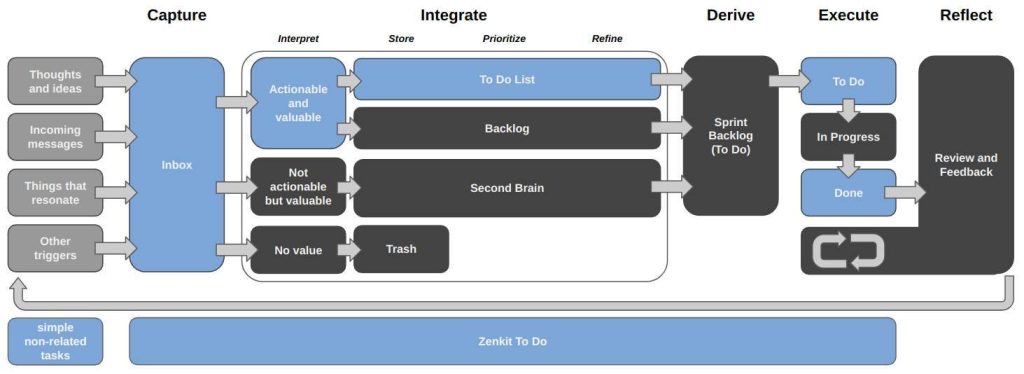
As I said before, my personal productivity system is heavily inspired by BASB, GTD, and Scrum. I mix and match different components and have created my own personalized approach that integrates both my second brain and my productivity system. The result is what I call CIDER, which is an acronym for Capture, Integrate, Derive, Execute, and Reflect, which is visualized below.

I use multiple software solutions for specific parts of my personal second brain and productivity system. In future articles, I will go into much more depth for all these applications. The application Zenkit To Do has an important role in this system to support specifically the handling of all my simple single non-(project)-related tasks, as visualized below:
In the remainder of this article, I will focus on what Zenkit To has to offer.
What is Zenkit
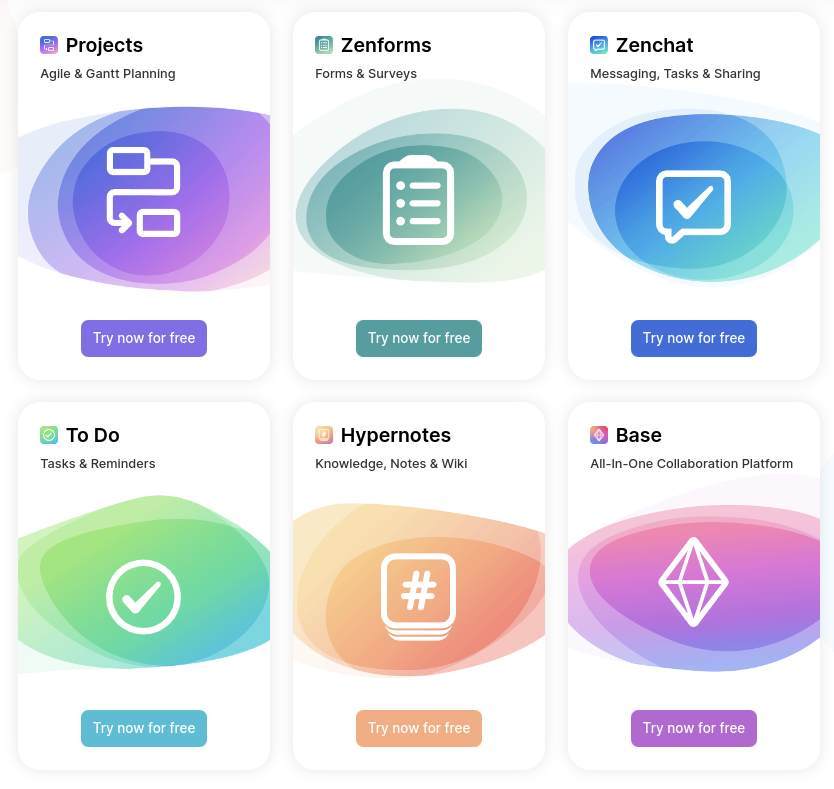
The developers behind the Zenkit Suite started already years ago by providing a Kanban-focused software solution called Zenkit, which initially was comparable with for example the well-known applications Trello and MeisterTask, but with more extensive functionality. Zenkit offered much more ways of organizing, managing, and presenting your task data than just a Kanban board, like a List view, a Table view, a Calendar, Mindmap functionality, and Team Wiki functionality. Later Zenkit transformed into Zenkit Base, which is positioned as a central hub for optimal data and user integration for all the apps in the Zenkit Suite, like Projects, Zenchat, Hypernotes, Zenforms, and of course Zenkit To Do. This tight integration makes the Zenkit Suite a really powerful collection of productivity software.
You can click on the image below (Affiliate Disclaimer) to try out one or more of the applications in the Zenkit Suite for free.
What has Zenkit To Do to offer
Zenkit To Do is a relatively simple but very powerful To-Do application that is available for every important platform, but also as a web-based application. Zenkit To Do is in my opinion best for situations that don’t require the more advanced project management Kanban, Table, or List functionality of Zenkit Base. Zenkit To Do is perfect for single non-(project)-related tasks. So a complete project like writing a book (in which you split up the work into smaller tightly related tasks and subtasks) is better managed in Zenkit Base or Zenkit Projects, but personal things like buying gardening tools, sending a cost estimate to your insurer, buying flowers for your mother, and defrosting your refrigerator, and your business related things like remember sending a letter, or sending a reply on a highly critical mail request, are tasks that you can manage very well in Zenkit To Do.
Zenkit To Do offers powerful planning capabilities, like due dates, reminders, and recurring tasks. Zenkit To Do supports the capture stage as described in GTD via the Inbox as a starting point to get all the tasks out of your head without directly thinking about the organization. Zenkit To Do offers smart list features, which automatically help you to have an overview of what to do today, this week, starred items, and what is assigned to you in case of a collaboration with multiple people. And indeed, Zenkit To Do supports collaboration, so you can work on tasks together with your business partners, friends, or family members. You can share tasks, lists, and folders, and track what all members are doing. Via the comments functionality, you can share insights on specific tasks with the people that are part of the collaboration. You can add rich notes like topic descriptions to clarify what needs to be done to finish a task. Push notifications help to be informed about what needs to be done without actively checking the content of the application.
In this article, I want to show how to use Zenkit To Do. In a future article, I want to focus on Zenkit Base and the strong integration between the two applications. To describe everything that Zenkit To Do has to offer, I want to go through some example scenarios and set up some lists and tasks and see what we can do with them.
The basics
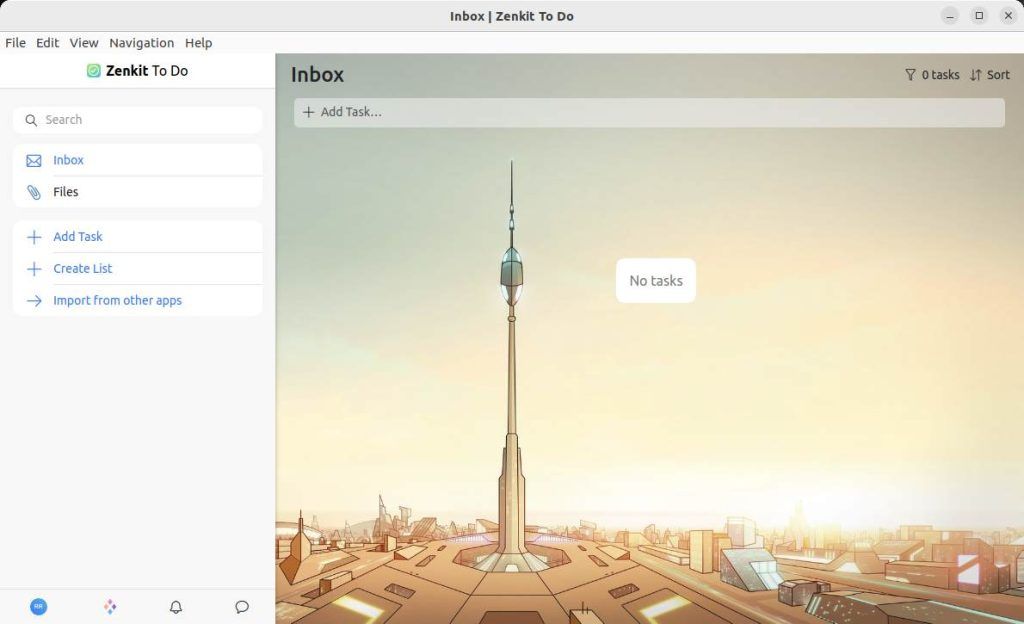
When we open the Zenkit To Do for the first time we see something like the following screen:
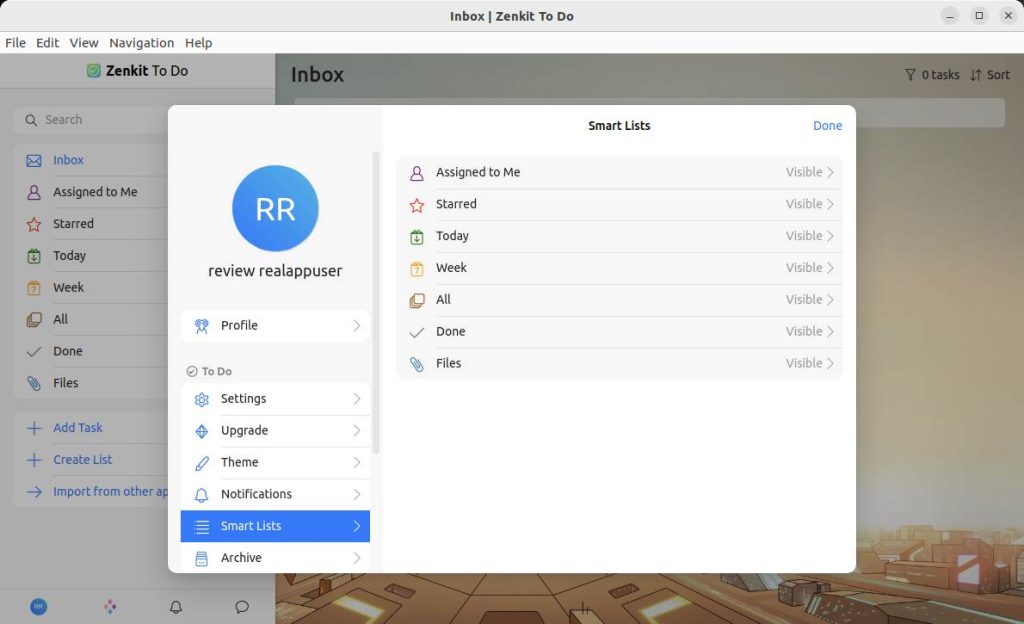
To give a better insight into what the user interface has to offer, let’s first activate all smart options. You don’t see them directly after the first start because we don’t have any tasks yet and the smart options are standard activated dynamically based on the available tasks. But we can set them to Visible. Do the following:
1) Click on the blue circle with your initials in the left bottom corner.
2) Click on Settings.
3) Select Smart Lists.
4) Change all options to Visible, like below, and click on Done to close the screen.
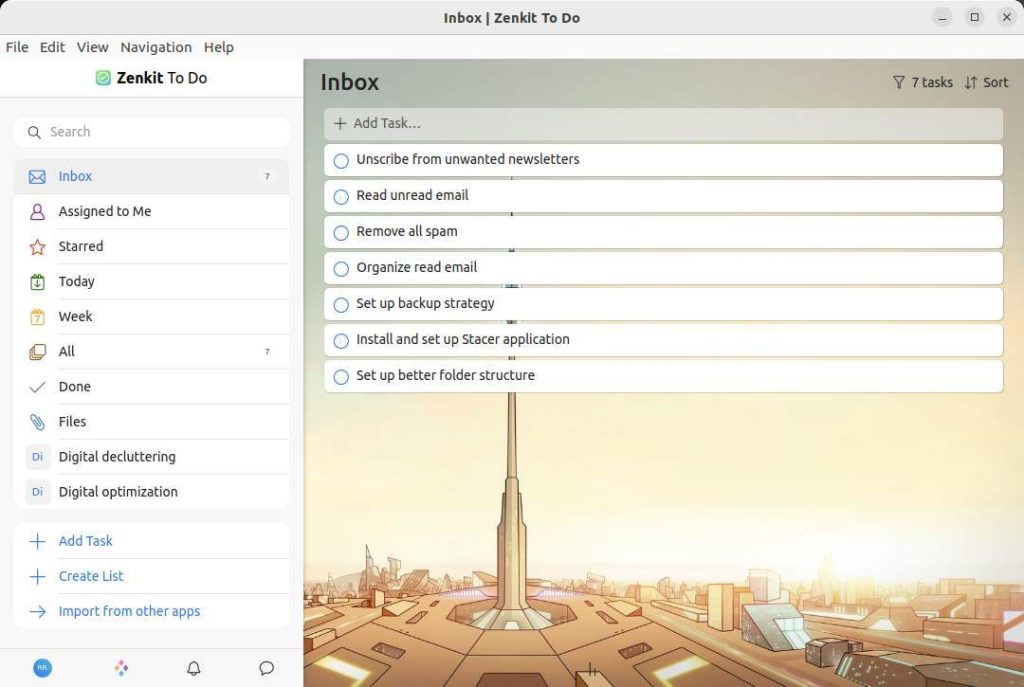
Now we see the following screen:
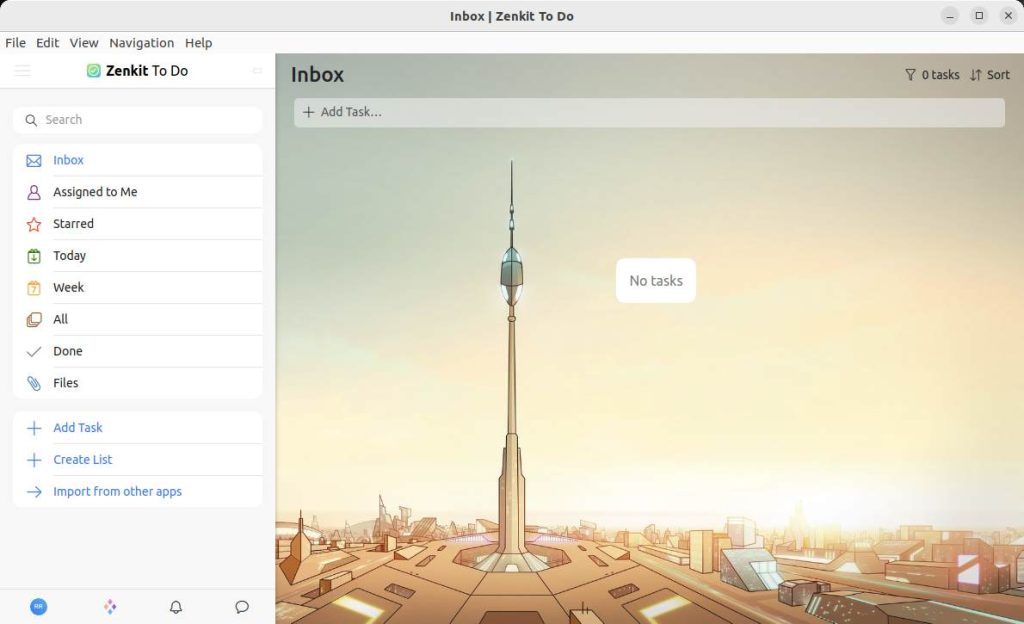
In the top part, we see the main menu with File, Edit, View, Navigation, and help. Via File, you can open multiple Zenkit windows, Add new tasks, Search, go to Settings, Logout, or Quit. Edit offers normal options like cut, copy, paste, delete and undo and redo options. View gives you options to zoom in and out and toggle full-screen mode. Via Navigation, you can move back and forward from the relative current position. Help brings you documentation, tutorials, and integrations with other applications via Zapier or API functionality to build a direct integration with your own tools.
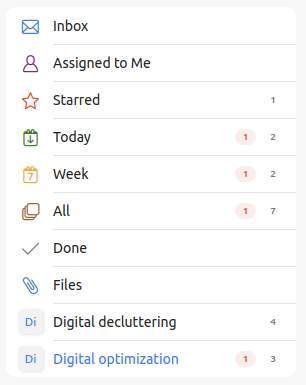
In the left area, we see options to hide or show that area, to search, and different smart list options to look at your tasks. Further, you can add tasks, create lists, and import from other apps. And when you create new lists, these will be shown in this area as well.
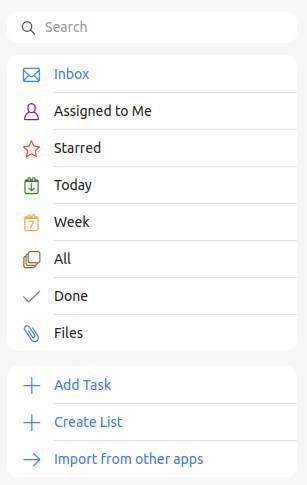
In this panel, which I like to call the view area, you can look at your tasks in different ways, like unorganized tasks in your Inbox, Starred tasks, tasks planned for Today or this Week, or just via a complete list of all your tasks. Via Done you can check what you already finished and with the new Files option, you see a complete overview of all the files that are attached to your tasks. Via Search, you can find specific tasks via a keyword.
You can organize your tasks even further via Lists, to differentiate for example between work-related tasks and home-related tasks. Or create a holiday preparation list or just a simple grocery list. We come to that later.
In the main area, we are creating the actual tasks.
In the top part of the main area, you find an icon to filter your tasks on different filter modes, an icon for sorting your tasks based on Title, Due Date, Date Created and Assigned To, and the area to add your new tasks.
In the bottom left section, you see icons for Conversations, Notifications, Apps, and an icon to go to your application Settings, Upgrade options, Help, Book a demo, and Logout.

Creating tasks
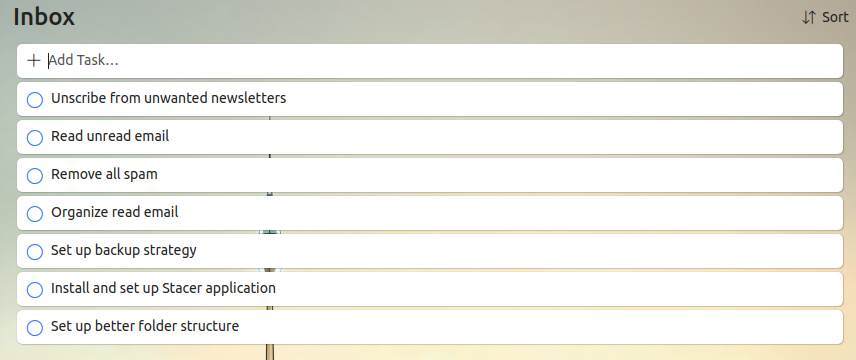
To guide you through the application I will use the example scenarios “Digital decluttering” and “Digital optimization”. Let’s first start creating some tasks.
First I make sure I select the Inbox view. Now I create my first task by clicking on Add Task.

Now we can add some tasks by typing the short description of the task and hitting Enter to add a new task.
Organizing tasks in Lists
Now we have 7 unorganized tasks in our Inbox. When we look at them, these tasks could probably be organized into two or more separate focus areas. So we create two lists by clicking on Create List in the left section of the screen.
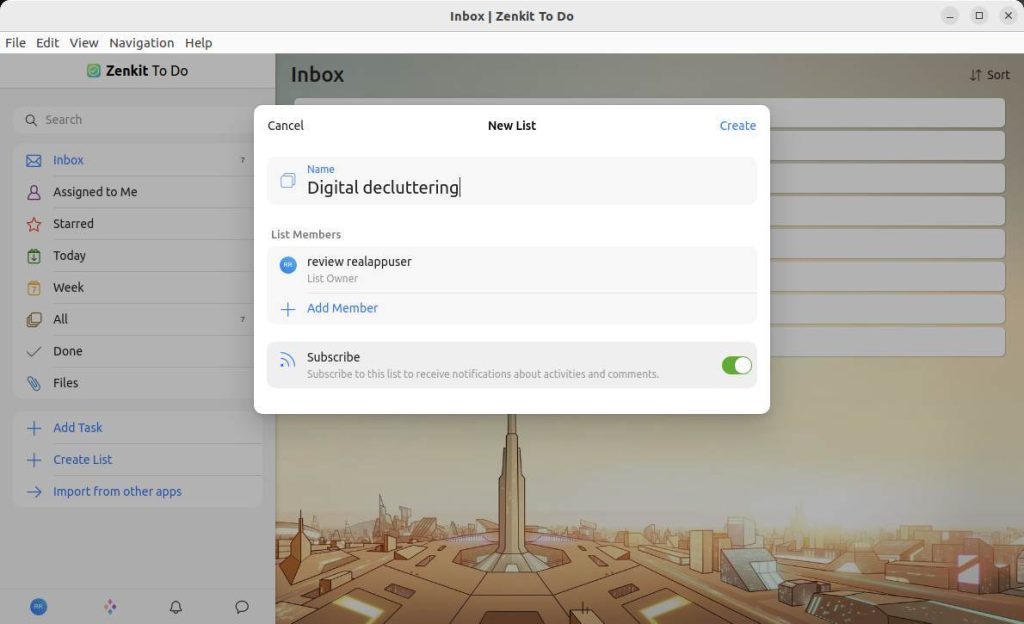
In this pop-up screen, we can enter a name for our list. Here we can also add additional members, and subscribe, but we come to that later. Below you see the two created lists, “Digital decluttering” and “Digital optimization”.
Now we can just drag and drop our tasks to the list they belong to, or right-click on a task to open some extra options for this specific task.
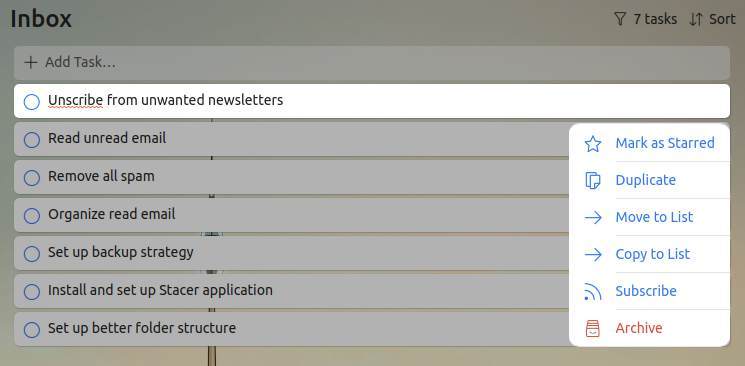
Here we can select Move to List, or we can use Copy to List if we want to reuse the structure of an existing task as a standard template, for example when a task has standard subtasks that you use more than once.

Now that I organized all my tasks by moving them to the correct Lists, we can see the number of tasks in each list next to the name of the list.
When we right-click on a List name a pop-up will show some list-specific options.
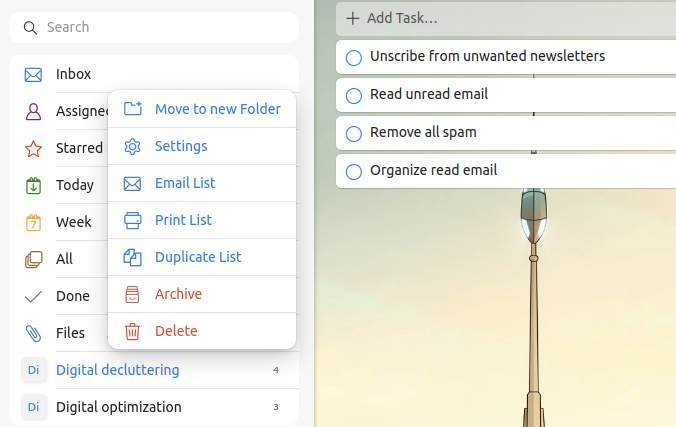
Here we can move the tasks to a new folder, open the settings specific to this folder, automatically create a new email with all tasks in the list, print a list with all tasks, make a copy of the complete list in this specific folder, archive the content of this list or delete the list.
When we click on Settings we see the following options related to this specific list.
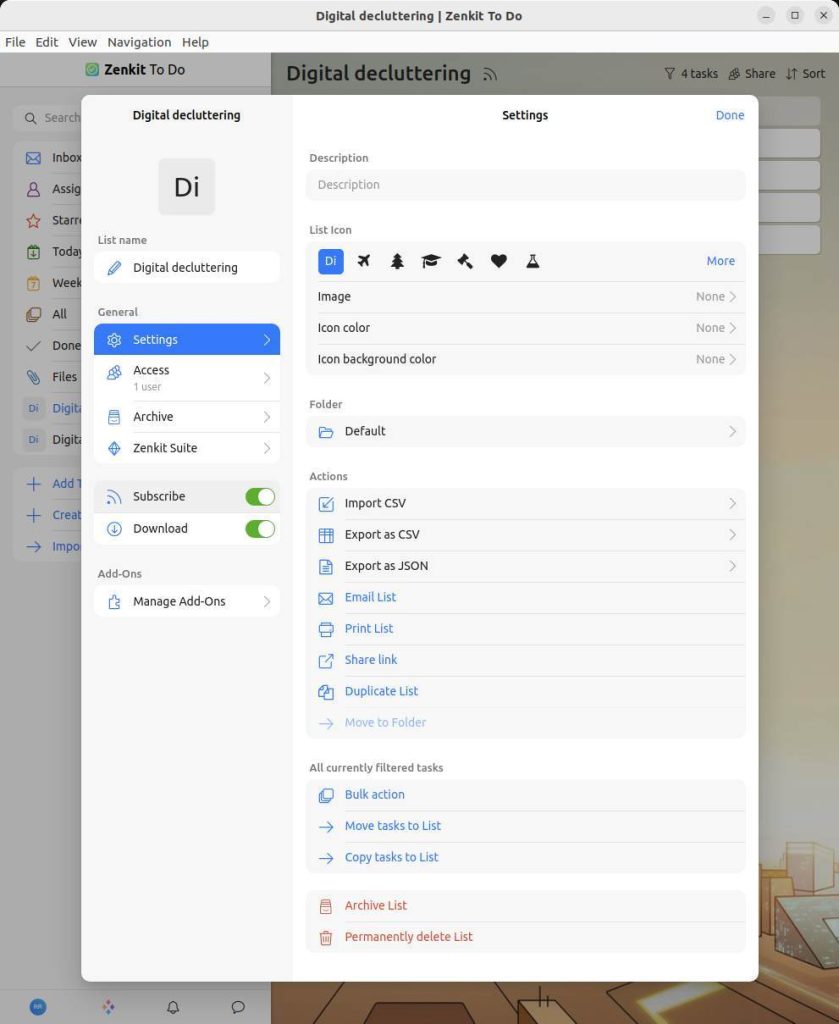
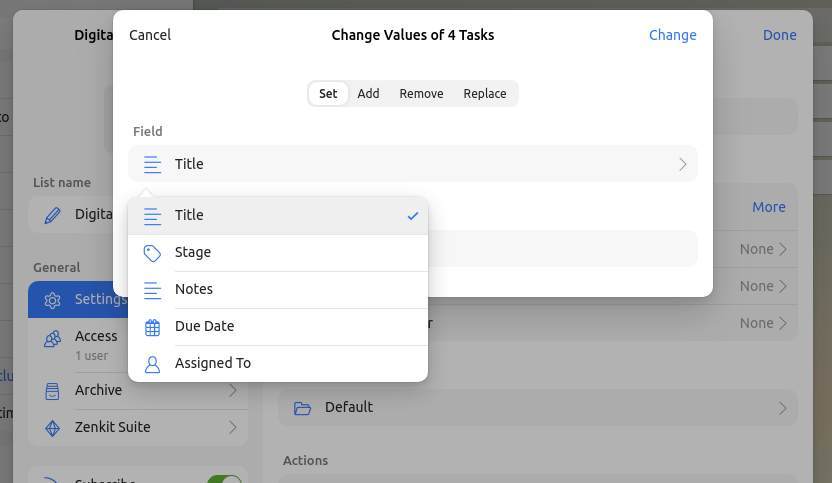
We first see everything related to the Settings tab. Here we can give a description to this list, change the “Di” abbreviation into an icon, change the icon color, and the icon background color. Next, we see options to import and export data, all the previously mentioned actions, and we have the option to carry out some bulk actions on all tasks in the list with respect to the Title, Stage, Notes, Due Date and Assigned to.
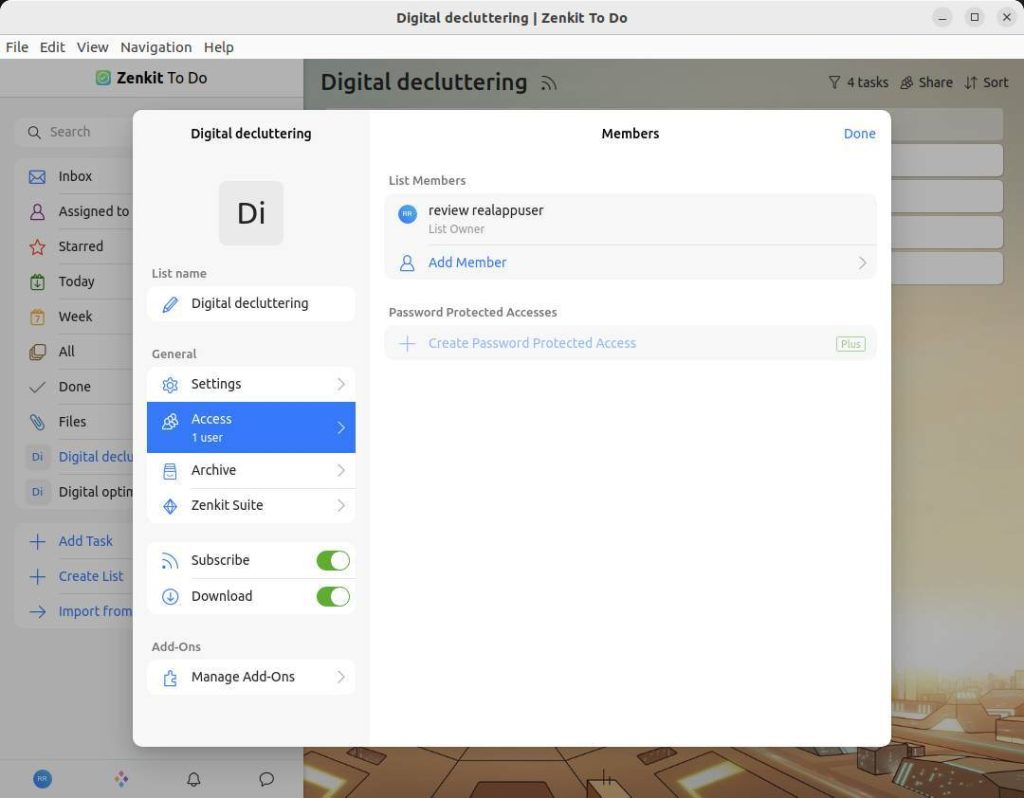
When we change from Settings to Access, we can add new members to this list, change the role of the member with respect to this specific list, and create password protected access.
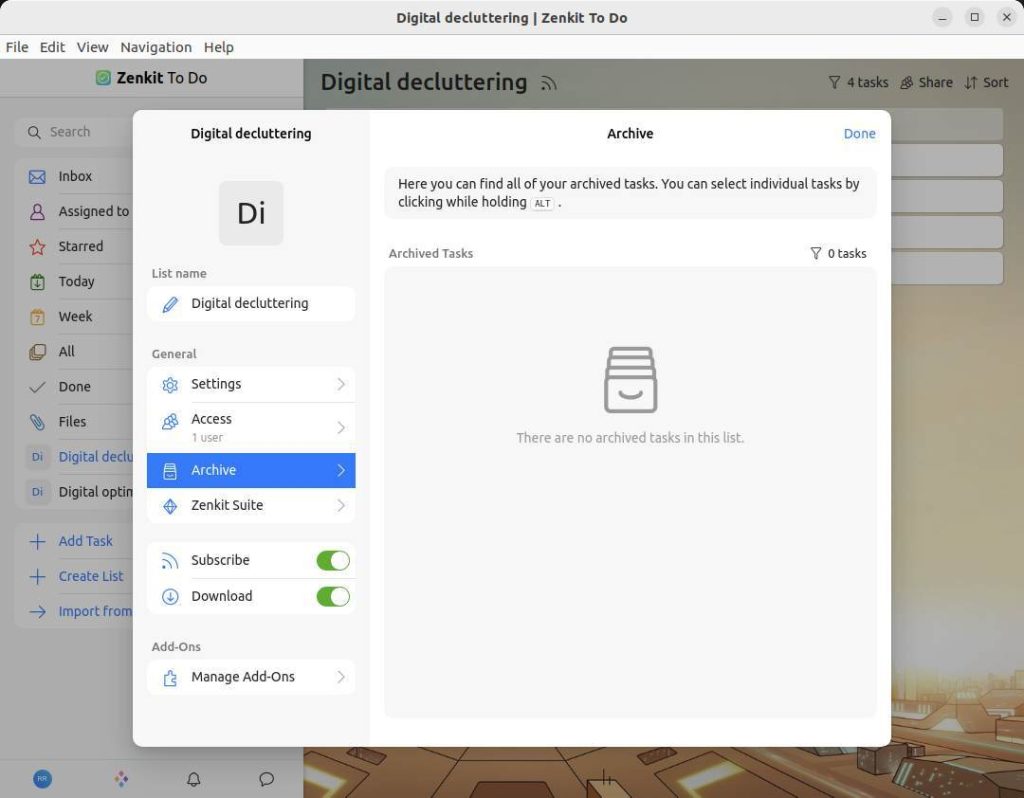
When we switch from Access to Archive here you can find all of your archived tasks.
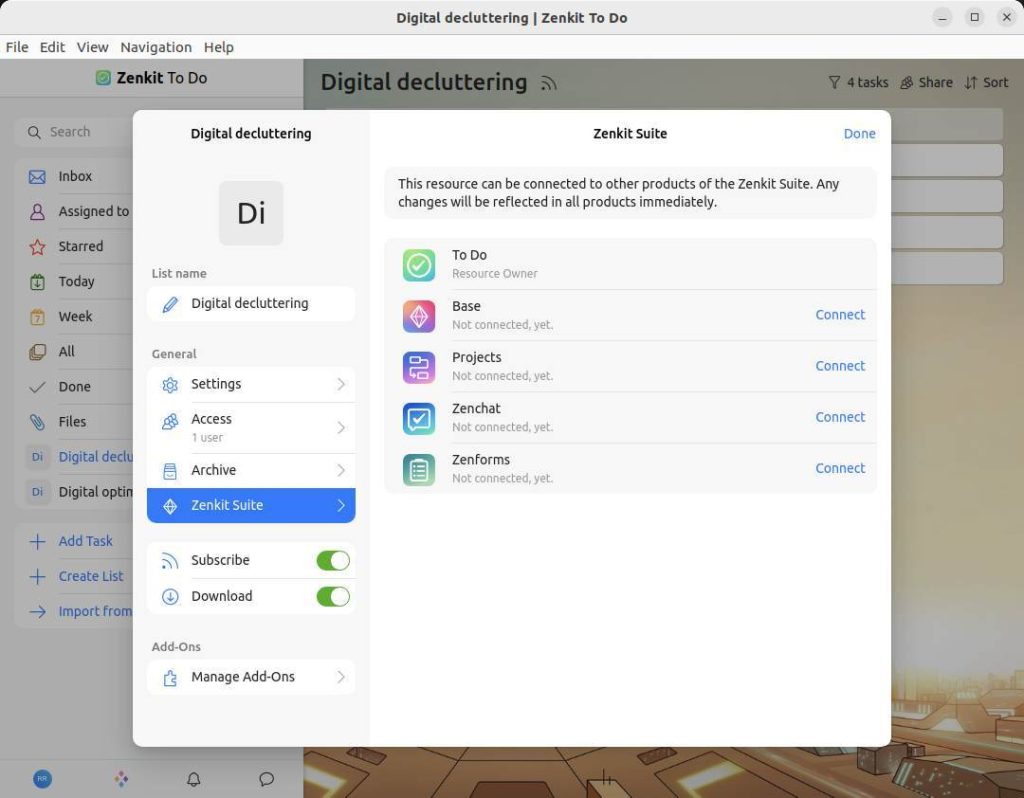
When we switch from Archive to Zenkit Suite, here we can connect this list to other products in the Zenkit Suite like Zenkit Base and Projects. After that, any changes in this list will automatically be updated in all connected products immediately. I will go into depth on this topic in a future article on Zenkit Base.
Via Subscribe you can toggle the subscription option On or Off. Via Download you can toggle the Download option On or Off. Via the Manage Add-Ons, we can change the list theme, set up an iCalendar subscription, and activate the option to create tasks by sending an email. These options are not part of the free tier of Zenkit To Do.
Working with tasks
When we create tasks we have some nice options to work with. So click on a task to see what is possible.
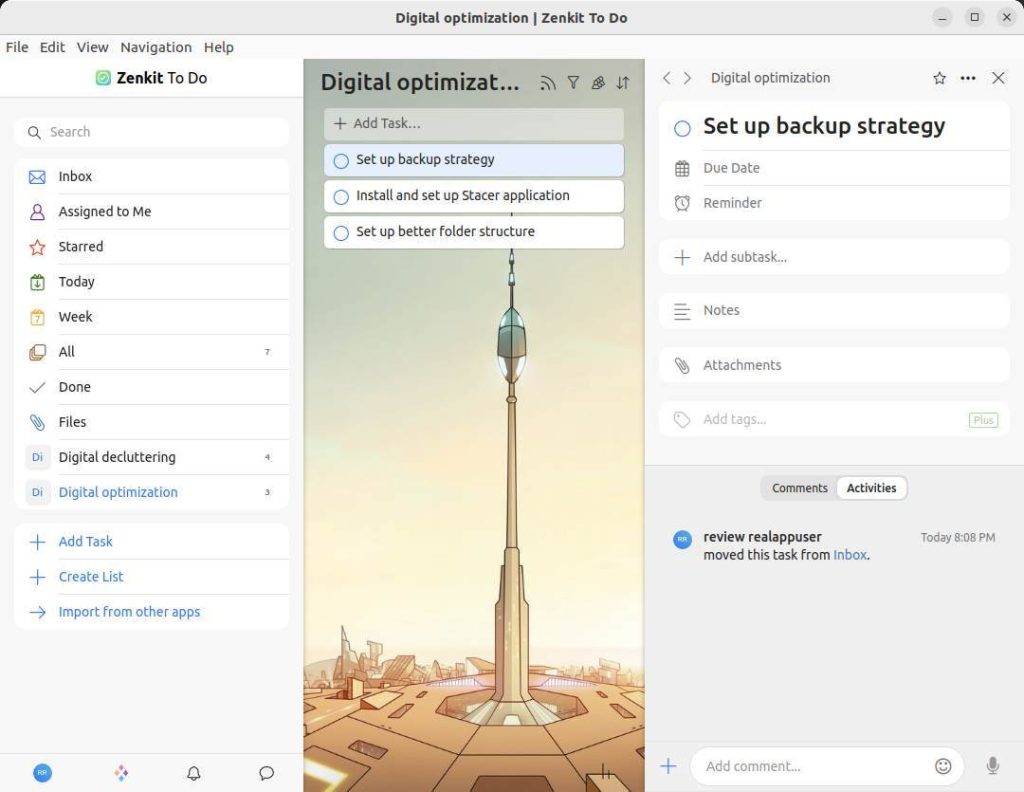
We see that an extra section opens on the right of the screen dedicated to this specific task. We can change this behavior to click on the three dots in the right top corner and select Show as popup, which is my preference because it makes the focus on the task options more clear.

Here we can add a Due Date, add a Reminder, add Subtasks, add Notes, add Attachments, add Tags, look at Comments or Activities, and add new Comments. It is even possible to add voice messages.
In the top right corner, you can click on the star so this task will be in the Starred list for a more convenient way of finding your most important tasks. When you click on the three dots again we have some additional options.
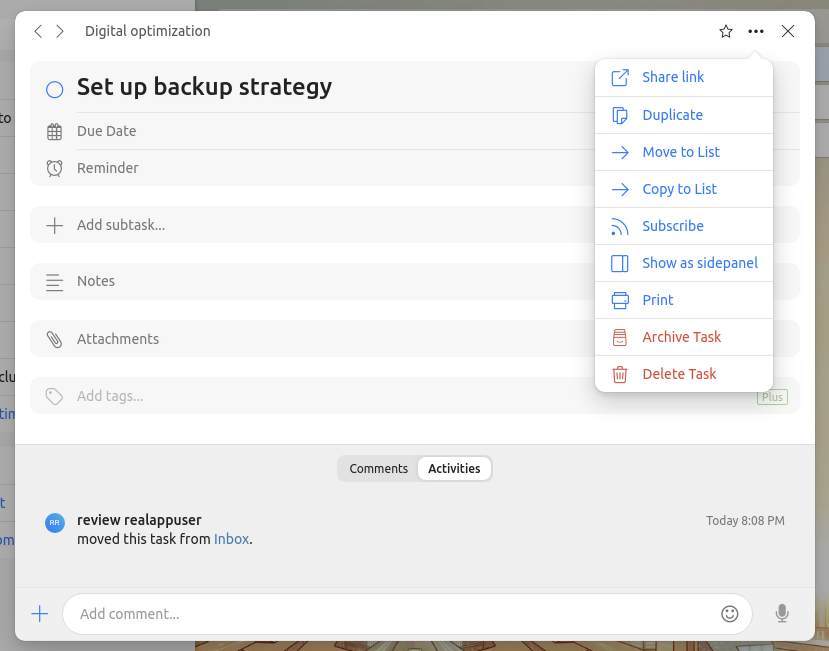
Here we can, as already mentioned switch between Show as popup and Show as sidepanel. We can share a link to this task with people you want to inform about this task. Further we have some duplication, move and copy options and the option to subscribe, archive, and delete.
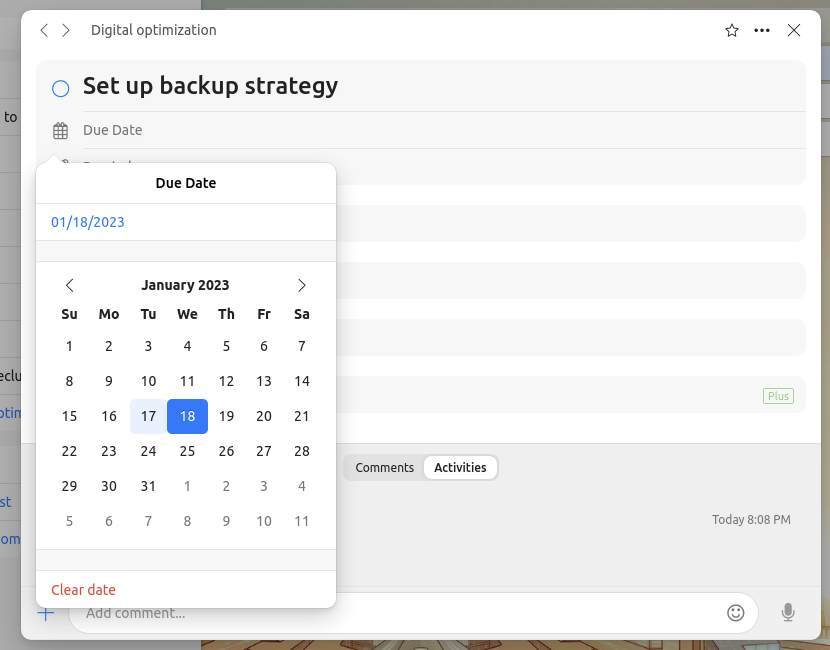
Now close this menu and click on Due Date. Give the date of tomorrow.
Now click on Reminder and set the date to the same date and the time to 09:00 AM.
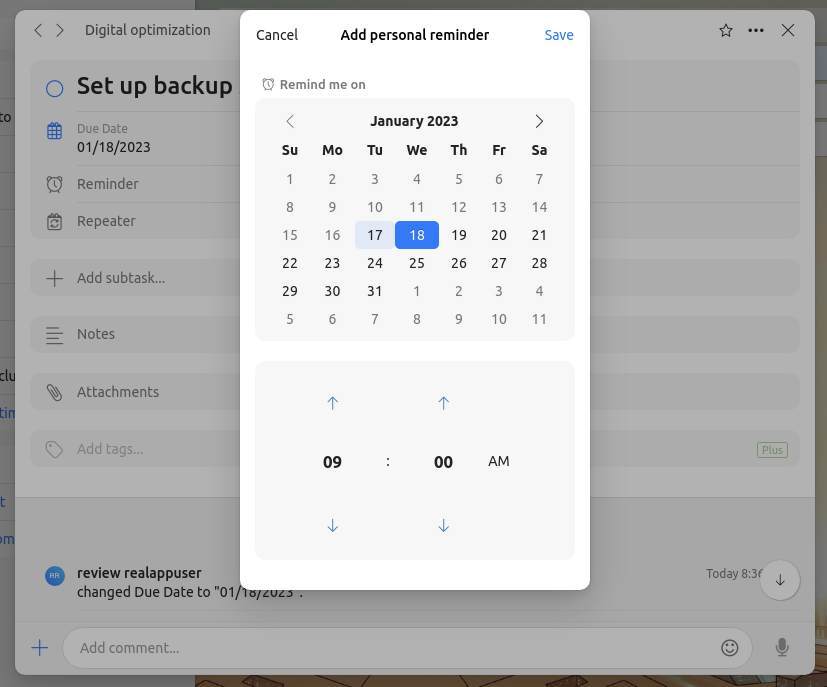
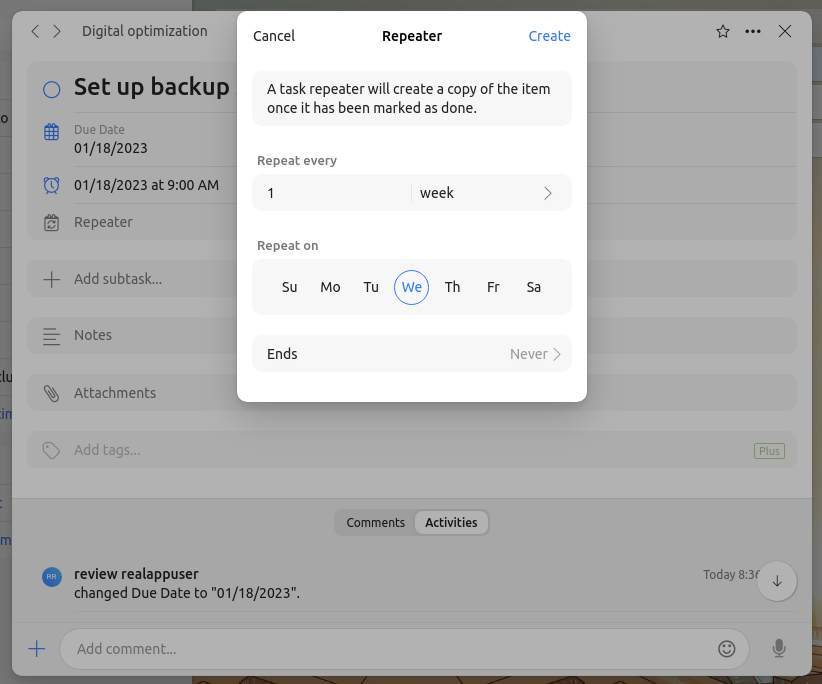
Now click on Repeater to set this task as a repeating task. Here you can change the frequency in days, weeks, months, and years, set the weekdays, and when the sequence must end.
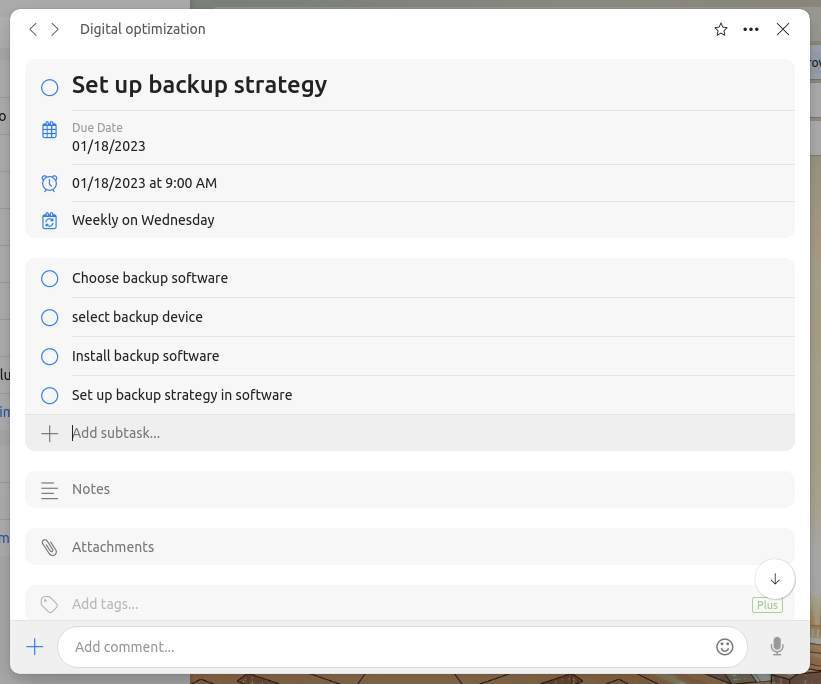
Now let us create some subtasks. You can create subtasks the same way as you created normal tasks by typing the description and hitting Enter.
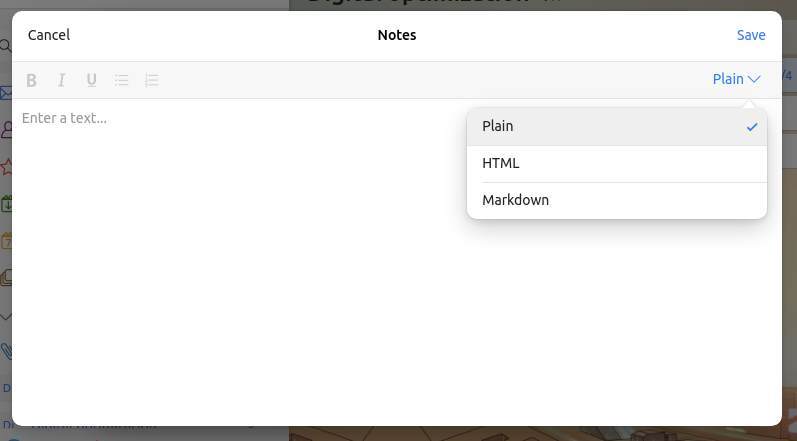
Now click on Notes to add a note to this task. Click on the maximize icon. In this new pop up you can choose between Plain, HTML, or Markdown formatting.
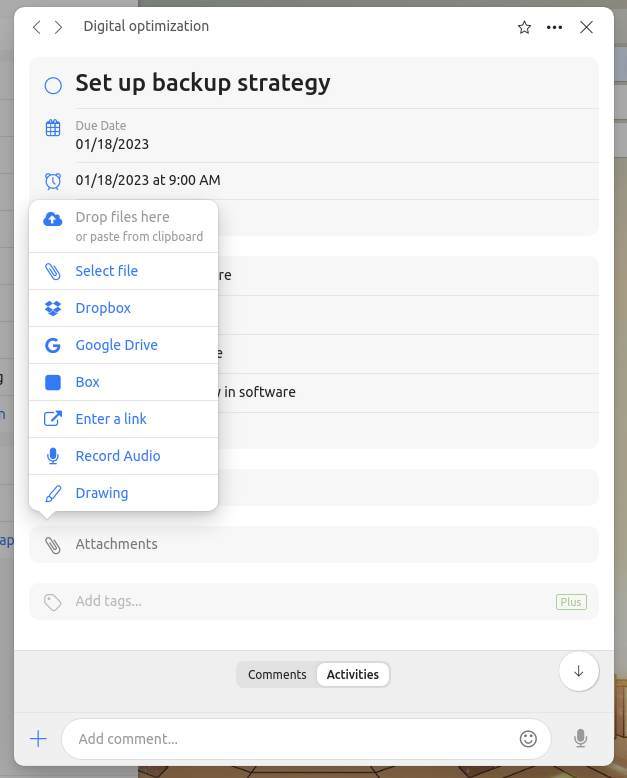
Now click on Attachments. Here we have the options to drop a file, select a file, get a file from Dropbox, Google Drive, or Box, add a link, or record audio, or a drawing.
Further, we can add a typed comment or a spoken comment to the task. We can also add files, a drawing, or link other tasks to this task by using the plus sign.
When we close the details of the task, we see that the task has some extra indicators, to have an instant overview of all assigned characteristics.
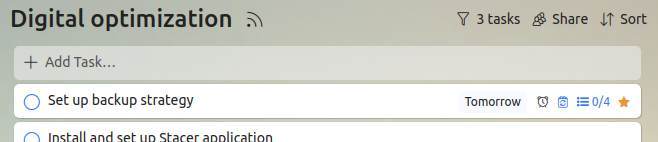
In the left panel with the smart lists we now also see the starred tasks, the tasks planned for Today, and the tasks planned for this week. Here you also see how many tasks that had a due date are overdue.
The only thing we did not do yet is the finished tasks. To finish a task you can simply click on the empty circle in front of the task title, so it moves automatically to Done, and the Done indicator in the view section is also automatically updated.
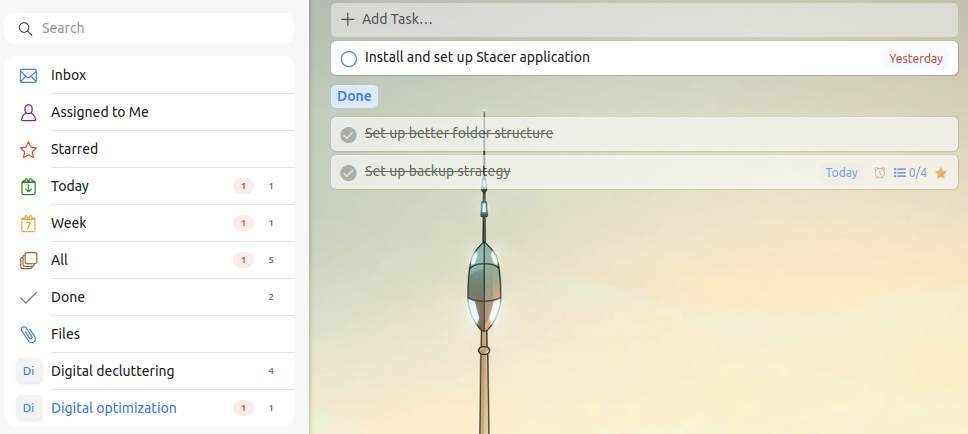
When you select a task with subtasks you can finish a subtask by simply clicking on the empty circle in front of the subtask description. When you look at your task now, you will see the number of finished subtasks updated and the task area is partly green to indicate the percentage of finished subtasks.

Settings
Now that I hopefully clarified the basic functionalities and how to work with tasks, subtasks, and lists, it is time to have a look at some additional functionalities and options.
Select from the main menu File / Settings or via the blue initials button in the bottom left choose Settings. This will open the following screen.
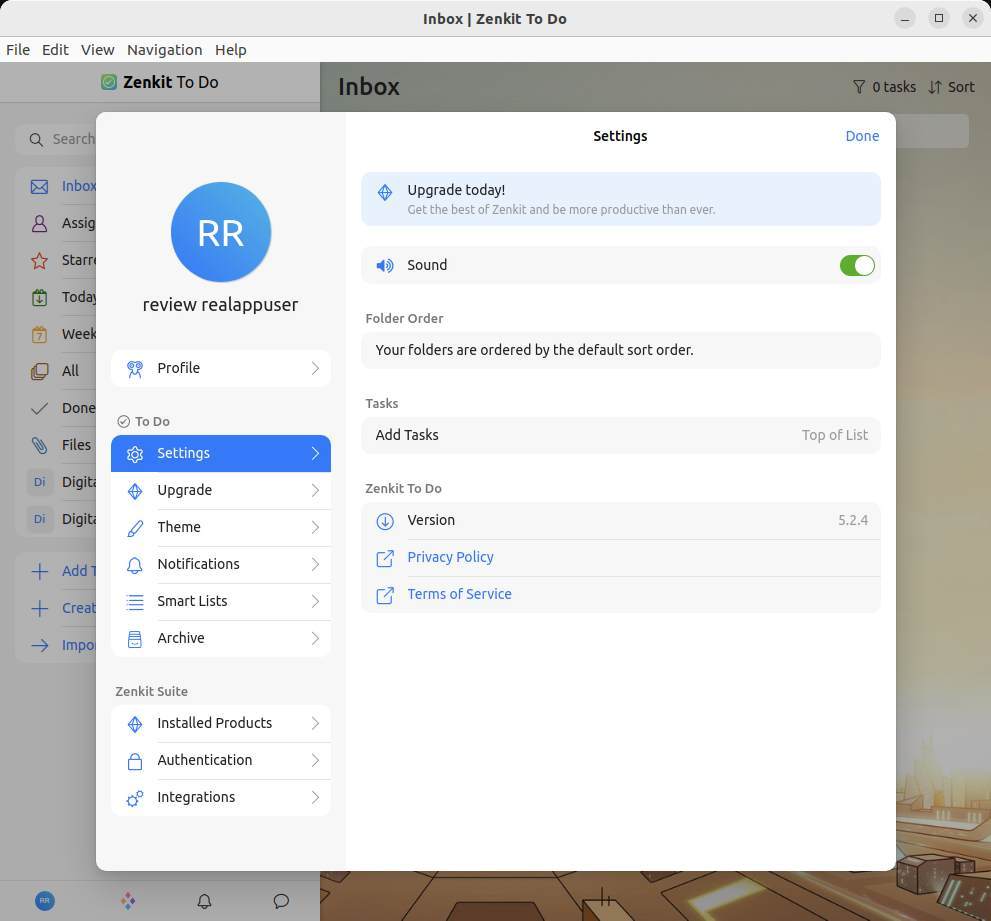
Here you can toggle sound on or off, set the way your new tasks are added to the existing list, and here you can upgrade from the free tier to a paid tier. In the Upgrade tab you have all information on how to select the proper upgrade path. Under Theme, you can select different backgrounds, dark mode and transparent mode. In Notifications you can set how you want to be notified of different events. And in Smart Lists, as mentioned before, you can set different views on how status information on tasks is being presented to you.
If you select the big blue dot with your initials in the top right corner, you can use an uploaded image instead of the initials.
When you click on the Profile option, the following screen will open.
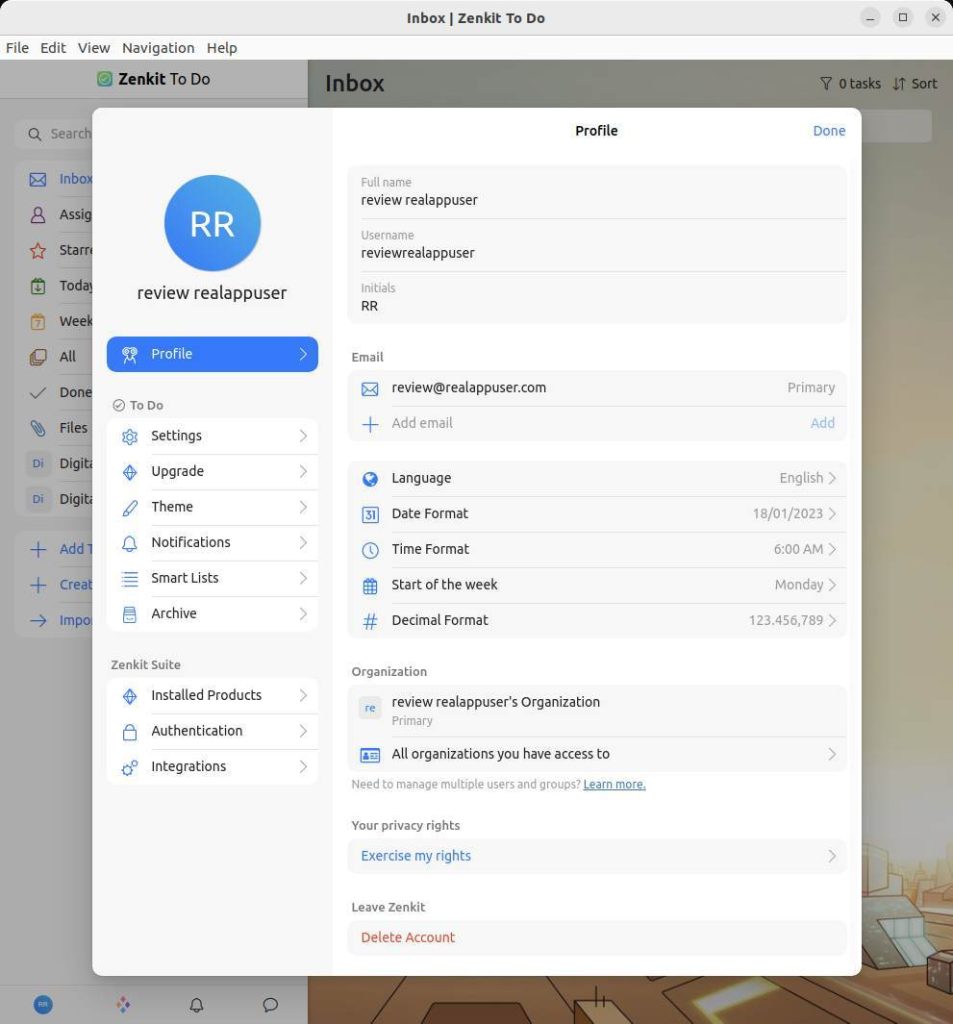
Here you can change settings for your profile, like your name, username, initials, email, language, date format, time format, etc. And this is the place where you can delete your account or exercise your privacy rights.
Further, you can check your installed products, and set your authentication settings for your password and Two Factor Authentication. And you can set up the required integrations and the API key.
How to download and install Zenkit To Do
Now that you have a basic idea about what you can do with Zenkit To Do and what place it can take in your productivity system, you may be eager to download the application and install it on your computer or mobile device. So let’s see where to find the downloads, how to install, or how to start Zenit To Do in the browser.
Zenkit To Do in your browser
You can use Zenkit To Do in most known browsers like Firefox, Safari, Chrome, and Chromium-based browsers like Vivaldi. Just open your browser and use the below link:
https://todo.zenkit.com/login.
Zenkit To Do for Windows
You can download and install Zenkit To Do for Windows from the Microsoft Store via the below link:
Get Zenkit To Do for Windows 10 and higher
Get Zenkit To Do for Windows 7 or later but before 10
Zenkit To Do for macOS
You can download and install Zenkit To Do for macOS from the Apple Store via the following options:
Get Zenkit To Do for Apple Silicon
Get Zenkit To Do for Intel Chip
Zenkit To Do for iOS and iPadOS
You can download and install Zenkit To Do for iOS and IPadOS via the below link:
Get Zenkit To Do for Apple IOS
Zenkit To Do for Android
You can download and install Zenkit To Do for Android via the below link:
Zenkit To Do in Linux
You have multiple options to download and install the Linux application.
Note: You can read more on different installation formats in my article “How to install applications in Linux Mint“, which is focused on Linux Mint, but has also value for other Debian / Ubuntu-based distributions as well.
Get Zenkit To Do for Linux in .deb format
Get Zenkit To Do for Linux in .rpm format
Get Zenkit To Do for Linux in .tar.gz format
Get Zenkit To Do for Linux in .AppImage format
Get Zenkit To Do for Linux in Snap format
Final Words
The goal of this article was to give an introduction to Zenkit To Do to support your productive life. This article will be part of a more extensive Zenkit Basics series, in which I will also go into depth in Zenkit Projects, Zenforms, Zenchat, Hypernotes, and of course Zenkit Base. As already mentioned before I don’t use only a to-do application for all my activities. For me personally, it is important to distinguish between larger projects with lots of interdependent tasks that go through different statuses for which I need a more robust project management tool, versus the simpler and often non-related tasks that require simpler organization. For the more large-scale project-based task management I prefer to use a Kanban-style workflow, which is in my case perfectly supported by Zenkit Base, the powerful big sister and the integration foundation for Zenkit To Do. But for a simpler task management workflow an application like Zenkit To Do perfectly fits my needs. If you like to separate your project management from your simple task management, then Zenkit Base and Zenkit To Do are a great combination, especially with the integration possibilities for instant task exchange between these two applications, which I will cover in a future article.
Although the free version of Zenkit To Do, but also their other products, already provides a lot of functionality to start with, if you are interested in the complete functionality that Zenkit To Do has to offer, please consider using the below affiliate link (Affiliate Disclaimer). At no additional cost to you, this website will earn a small commission if you choose to click through and make a purchase via the linked website.