In productive corporate environments, but also by solopreneurs and hobbyists, Kanban-based applications have been enthusiastically used for years to manage tasks in a more visual way. Many productive app users will be familiar with Kanban applications such as Trello, ClickUp, Asana, and Jira. These applications help you to make and maintain insight into all your tasks and their status and progress more easily. However, these applications are often closed-source systems with proprietary data storage. However, if you are more interested in open-source solutions, then perhaps the Kanban plugin for the very popular Joplin note taking app is something for you. In this article, I explain how to add Kanban functionality to the Joplin note taking app.
Note: This article contains affiliate links. At no additional cost to you, I will earn a small commission if you choose to click through and make a purchase via the linked website. For more information see the Affiliate Disclaimer.
Content of the article
- What is Kanban
- What is Joplin
- About the Kanban plugin for Joplin
- How to add Kanban functionality to Joplin
- Initial setup of the Kanban plugin
- Create extra columns in the Kanban board
- Reorder columns in the Kanban board
- Adding note-based tasks
- Adding to-do-based tasks
- How to use filters
What is Kanban
Kanban has been around for quite a long time, but is currently very popular in the world of project management and is used by many startups and larger organizations. In this article, I will not go in too much detail on this topic, because I already published my article “How to be more productive with Kanban and what are my favorite Kanban apps“, in which you can find far more details and insights.
“How to be more productive with Kanban and what are my favorite Kanban apps“
In short, I can share that the idea behind Kanban was introduced to Toyota by Taiichi Ohno in the early 1940s. Freely translated, Kanban can roughly be described as a “signboard” and was used within Toyota as an optimization tool or planning tool to streamline production processes and dependencies between different production lines. Kanban provides a clear insight into what needs to be done, who is working on what, and what has been completed, and links this to priorities and mutual relationships.
Although Kanban was first introduced in a factory-oriented environment, it can be used for any production process. So if you are writing a book, writing articles for websites, or if you are a student, then Kanban provides both an excellent methodology and visualization solution.
Kanban has two main components, namely the method and the tooling. As a method, Kanban recommends breaking up your project into small tasks that result in small, manageable pieces of work that can be realized individually within a relatively short period of time, that are easy to oversee and, if necessary, can also be properly shared or exchanged between several team members.
The other part is the tooling. The most important tool for using Kanban is visualization of your workflow. This does not necessarily have to be a visual software solution, but can also be based on physical cards on a physical board or yellow sticky notes on a white wall. On the basis of a board, categories, and cards, you can make a visual overview of all your tasks, including the corresponding descriptions, the priorities, the status of those tasks, and who is responsible for what.
If you want to read more in-depth on Kanban, you can have a look at the book of David Anderson, who brought Kanban to the world of Information Technology: “Kanban: Successful Evolutionary Change for Your Technology Business”. You can find Call Newport’s “Digital Minimalism” by clicking on the link above or the image below (affiliate info):

What is Joplin
Joplin is a powerful open source, platform-independent, subscription-free, and cost-free note-taking, and note-making tool, available for all operating systems, but also on all mobile devices, with sync capabilities with various cloud services including Nextcloud, Dropbox, OneDrive, WebDAV, or your local file system. Joplin offers an extensive set of possibilities, whatever you can imagine you need for capturing various kinds of notes. Think about a web clipper for Firefox and Chrome, note history (revisions), support for notes, to-dos, tags and notebooks, sort notes by multiple criteria, like title, and updated time, markdown support, multimedia notes, like images, videos, PDFs and audio files, and collaboration options.
Joplin is by nature a hierarchical note-taking system. You organize all your notes in a folder structure. Joplin can be extended with all kinds of plugins to further align the application to your needs. In this article, we will look at the Joplin Kanban Plugin.
If you want to find out more about what Joplin has to offer and how to get it, go to the following website:
You can find all information on how to download and install Joplin here:
https://joplinapp.org/help/#desktop-applications
About the Kanban plugin for Joplin
The great thing about Joplin is that it has a plugin system, with which the standard functionality can be further expanded. If you are interested in the complete list of Joplin plugins, have a look here:
https://github.com/joplin/plugins/blob/master/README.md#plugins
The Kanban plugin was initially proposed and started by Balint Magyar from Hungary. The Kanban plugin makes it possible, just like in other dedicated Kanban applications, to set up a Kanban board and set up a column structure that suits your personal way of working.
Every item on the Kanban board is actually a single Joplin note. The individual notes can be dragged from column to column within the Kanban board, for example, according to the status of an activity. The Kanban board itself is a special type of note that contains the configuration data. We will discuss this in more detail later in this article.
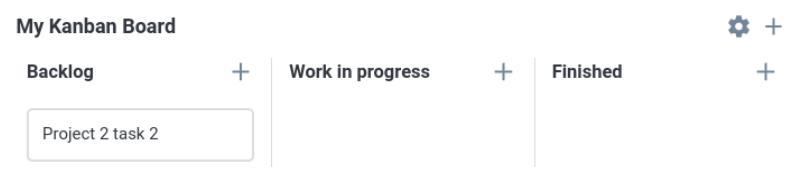
Below is an example Kanban board based on the Joplin Kanban plugin:

How to add Kanban functionality to Joplin
As already indicated, you can expand the Joplin application with additional functionalities, such as the Zettelkasten plugin (read my article: “How to set up and use Joplin as a Zettelkasten application“). In the rest of this article, we will look together at how to add Kanban functionality to Joplin.
1) Open Joplin and via the menu go to Tools / Options / Plugins.
2) In the search area type “Kanban”.
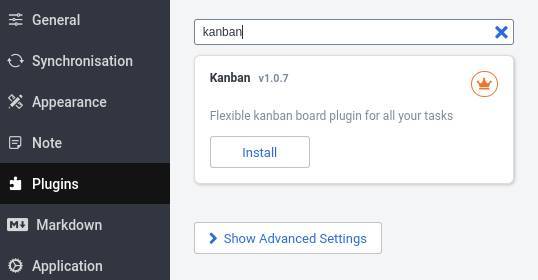
3) Click on Install.
4) Restart Joplin.
The Kanban plugin is now added to Joplin.
Initial setup of the Kanban plugin
Now that the Kanban plugin is available, we need to do an initial setup. We need to create a new notebook to create the configuration and the notes as part of the Kanban board. The Kanban board can only show the tasks (being Joplin notes) in this main notebook or the containing sub-notebooks, if applicable.
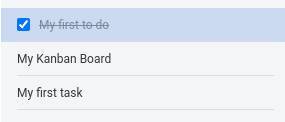
1) Create a new notebook with for example the name “Kanban”.
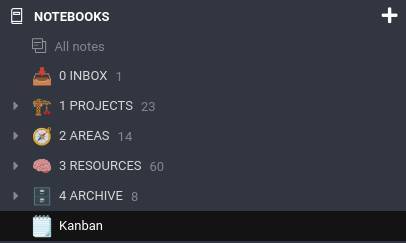
2) In the Kanban notebook, create a new note with the name “My Kanban Board”.
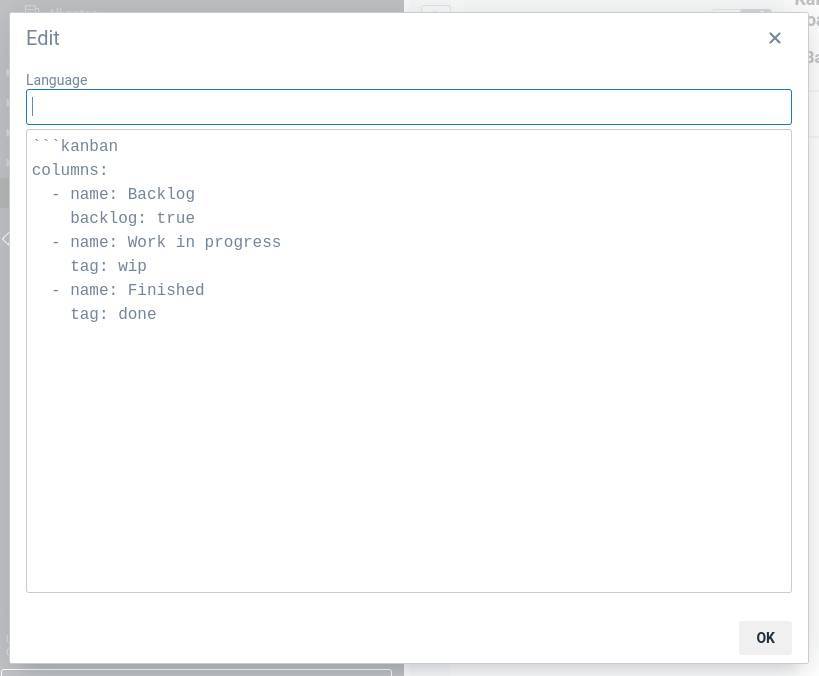
3) Copy and paste the below code into this new “My Kanban Board” note.
“`kanban
columns:
– name: Backlog
backlog: true
– name: Work in progress
tag: wip
– name: Finished
tag: done
“`
4) Now create a new note as a placeholder for your first task with the name “My first task”.
5) Go back to the “My Kanban Board” note. You should see the newly created Kanban board with My first task in the Backlog column.

Note: It can be that you see a YAML Parse error. To solve this double-click on the code block and in the opened Edit pop-up click on OK.
Now you can create extra notes in the My Kanban Board notebook and drag and drop with your mouse these notes between the different columns.
Note: Keep in mind that if you open a note outside the Kanban notebook or if you close Joplin and start it again at another moment, you always first need to select the My Kanban Board note with the configuration data to show the board again.
Create extra columns in the Kanban board
The Kanban plugin for Joplin has the flexibility to add columns. Keep in mind the following:
- Column names must be unique
- A column is defined by one or more rules.
The rules for each column determine which notes are assigned to which column. When you move a note from one column to another, the tag of the new column will automatically be assigned to the note and the previous tag will be removed. When you change the tag directly in a note, the result will be that a note will automatically move to the respective column.
Here is the list of supported rules (source: https://github.com/joplin/plugin-kanban):
- tag: … Matches if the note has the given tag. If the tag doesn’t exist, it is created automatically. You can also use tags to define a list tags.
- notebookPath: … Matches if the note is in the notebook, defined by the path. You can read more about notebook paths below, in the filters section.
- completed: true Matches if the note is a todo and is marked as done. You can also use completed: false to match uncompleted todos.
- backlog: true Matches if the note doesn’t fit into any other column. You can use this to collect all your unmarked notes.
1) The first option to add a column is by clicking on the plus symbol next to the gear icon in the top right.
2) Name the column “In review”.
3) Add a new rule called Tags and name it “review”.

Now the new column will be visible.
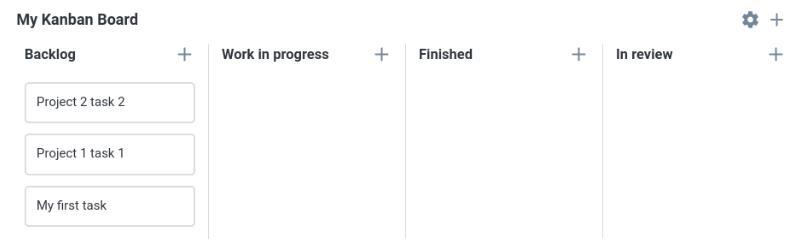
Another option to add a column is to create it directly in the configuration note.
1) Go to the My Kanban Board config note and double-click the code block.
2) At the end of the code add the below:
– name: To do
tag: todo
Now (after reload) the new column To do is added.
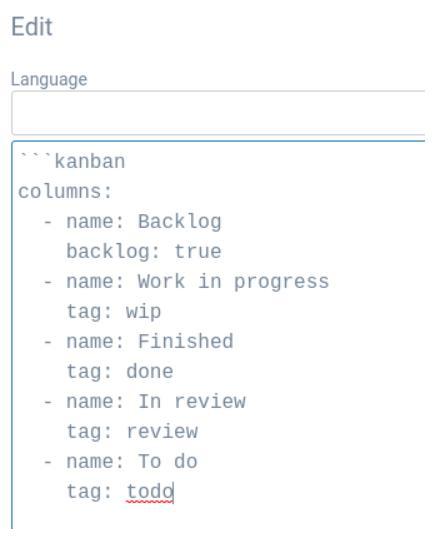
Reorder columns in the Kanban board
The Kanban plugin for Joplin has the flexibility to reorder columns.
1) Go to the My Kanban Board config note and double-click the code block.
2) Select the code lines for a specific column, cut them, and copy them in another location to reorder these columns, like below:
Before:
columns:
– name: Backlog
backlog: true
– name: Work in progress
tag: wip
– name: Finished
tag: done
– name: In review
tag: review
– name: To do
tag: todo
After:
columns:
– name: Backlog
backlog: true
– name: To do
tag: todo
– name: Work in progress
tag: wip
– name: In review
tag: review
– name: Finished
tag: done
Now the Kanban board looks like this:

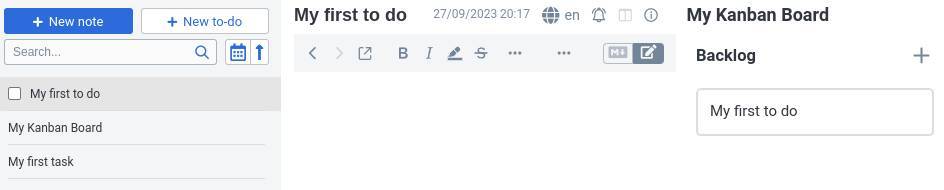
Adding note-based tasks
Adding note-based tasks is easy. Just click on the plus symbol in one of our columns and a new note will be created.
1) Click on the plus symbol in a column header.
2) Change the title of the note and if applicable, add some extra content.

You can also create a new task or note via the New Note option. When you don’t give this new note a tag, it will automatically be assigned to the Backlog column, based on the rule “backlog: true”. When you give it a tag corresponding to one of the columns, it automatically will be placed in the respective column.
Adding to-do-based tasks
You can also add to-do-based tasks. The nice thing about a to-do item is that you can check it as done. Based on the rule “completed: true” which you can assign to for example the Finished column, checking a to-do item will automatically result in a move to the Finished column.
1) Go to the config note “My Kanban Board” and double-click on the code section.
2) In the code section add “completed: true” as a new line to the Finished section, so it looks like this:
– name: Finished
tag: done
completed: true
3) Now create a to-do via the New to-do button
4) Now check this to-do item as done.
Now this item will automatically move to the Finished column.

How to use filters
You can also use additional filters so only notes with specific tags will be visible on the board. If you want to add additional notes for explanation or background information in the same notebook as the Kanban board, but you don’t want to have these items on the board itself, you can do the following:
1) Click on the gear icon on the right top of the Kanban board.

2) Click on Add a new rule and select Tags.
3) Type the tag “showkanban”.
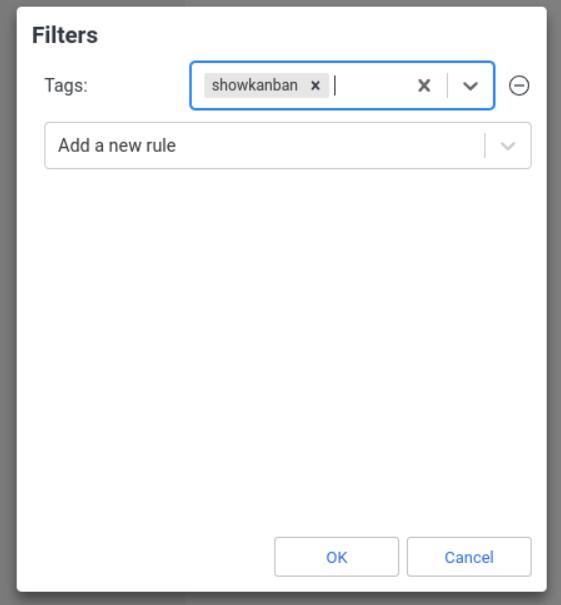
Now you will immediately see that all tasks/notes are gone and the board is empty.
4) Select one of your notes and add the tag “showkanban”.

Now the task will be visible again on the Kanban board.
Final words
I use Kanban boards every day, both for my daily work as a Senior IT Solution Designer, but also for my personal projects, such as my two websites, and writing my books. Visualizing the status of activities and interactions provides a lot of added value for me, but I know for many others as well, compared to simple lists. There are many wonderful Kanban solutions and even the old-fashioned paper approach can also work well. If you are already an enthusiastic user of Joplin, this Kanban plugin may suit your way of working. It doesn’t offer the most comprehensive solution like Trello, Zenkit, and Asana, but often less is just more. I’d say give it a try and you might be pleasantly surprised.