Image by John Been
Many of us have a creative side and nowadays all those creative results can be shared digitally through the many available sharing platforms. These platforms are great for getting feedback on what you are creating, as you can showcase your photos, drawings, music, and texts to the whole world. And with the growing number of online selling platforms, it is also effortless to sell your digital products to a worldwide audience. One of these platforms is Gumroad. I use Gumroad myself to offer my series of hand-crafted desktop wallpapers, and based on my experience I think that it is an easy starting point for anyone who wants to bring digital products to the attention of a large audience. So in this article, I want to explain how to sell your digital downloads and products on Gumroad.
Content of the article
- About publishing your own digital products
- What is Gumroad
- How to set up a Gumroad account
- How to set up your Gumroad store
- How to add your first new product to Gumroad
- Testing your new product
- Personalize your landing page
- Final words
About publishing your own digital products
I personally think it’s great that modern digital platforms have made it possible for “ordinary people” to showcase their creative achievements to a huge audience. In the past, if you wanted to sell your own book as an unknown author, it was almost impossible to find a publisher who found your book interesting enough to publish it. The supply of books was determined by others. But in this modern digital world, it is no longer necessary to work with a publisher. You can offer your products, such as your first book, entirely by yourself. For example, I was able to self-publish my own first book through KDP last year. This democratization of the publishing process ensures that not a select small group of publishers determines whether your product is interesting enough to sell, but that a worldwide community determines whether your product is interesting enough to buy. Partly because of this, there are suddenly many unexpected gems to be found that would otherwise never be published.
What is Gumroad
Gumroad is an online e-commerce selling platform for digital products. The advantage of selling digital products is that you only have to create them once, but you can sell them in an unlimited number. Platforms like Gumroad then take a place between the selling creative and the buying public, providing a platform in which all the necessary tools are available to store, describe, promote, sell, track statistics, and receive and process payments. In addition, it supports you to build a following that helps you to get your products under the attention of an even larger group of potentially interested parties.
What can you think about when selling digital products? For example Notion templates, graphic novels, design mockups for websites, tutorials, paint brushes for Procreate or Krita, 3D models for blender, fiction and non-fiction books, photographs, courses, drawings, and as I do, desktop wallpapers.
Gumroad has, among others, the following to offer:
- Offer memberships or subscriptions for your products or services.
- Offer discounts.
- Use different currencies.
- Gumroad can create license keys when you are selling software.
- Sell multiple versions, like PDF, ePub, and Mobi for your digital product.
- Build an audience with Gumroad’s free email marketing tool.
- Sell directly on Gumroad when you have no website, or embed the platform functionality in your existing website.
- Embed Gumroad’s payment functionality on your personal website.
What about the cost to use this platform as a creative seller? Gumroad has no monthly charges, like some other platforms. Gumroad takes 10% of your sales (excluding credit card processing or PayPal fees).
So now let’s take a look at how you can sell your digital products through Gumroad. I’m doing that based on a real example, where I’m going to add, describe and price my newest Desktop Wallpaper series, in my Gumroad environment.
How to set up a Gumroad account
To get started, we first need to set up a Gumroad account. To do so, go to https://gumroad.com/ and then click on Start Selling. Here you can connect with Facebook, connect with Twitter, or create an account with an Email and Password. I will not go through the complete process of setting up your account, as it is really self-explanatory. In the next section, I will go more in-depth about how we can change some of the settings in your Gumroad account to fit it better to your needs.
When finished creating your account, you can directly start with the first steps to selling your first digital products.
How to set up your Gumroad store
Now that we finished setting up our account, we can log into our account.
1) Go to https://gumroad.com/ and click on Login.
2) Next you will see a message about Two-Factor Authentication. An Authentication Token has been sent to your Email address. Type the code as provided in the Email and click on Login.
Now you are in your Gumroad dashboard. Here you have different sections like Home, Products, Posts, Audience, Analytics, Payouts, Discover, Library, Help, Settings, and your Profile.
Settings
Let’s first go to Settings.
Here you see again multiple sections:
- Settings – Here you can change your Email, your Notifications settings for your purchases, recurring payments, free downloads, personalized product announcements, and comments. You can add a dedicated support Email address. You can change the Language, the Time zone, and the Currency. You can enable purchasing power parity to charge differently depending on the cost of living in different countries.
- Profile – Here you can change your Username, and your Name and add a short Bio. Also, you can add a logo for your Gumroad profile and product pages. You can also change the highlight color, and change the order of your products.
- Team – Here you can add team members if any to help you run your Gumroad store.
- Payments – Here you can set up the payout method and change the payment-related details. Here you also can set up your PayPal connection.
- Password – Here you can set a new password.
- Third-party analytics – Here you can, as the name implies, set up third-party analytics, like Facebook and Google.
- Advanced – In this section, you can set up a custom domain, block certain Emails from purchasing, send test ping to URL, use the Gumroad API for your own application, and Delete your Gumroad account.
I will say a bit more about the Profile section later in this article.
Home
In this screen, you will be helped out with Customizing your profile, Creating your first product, Getting your first follower, Making your first sale, Getting your first payout, and Sending out your first email blast. Further, you see your best-selling products and activities about followers and sales.
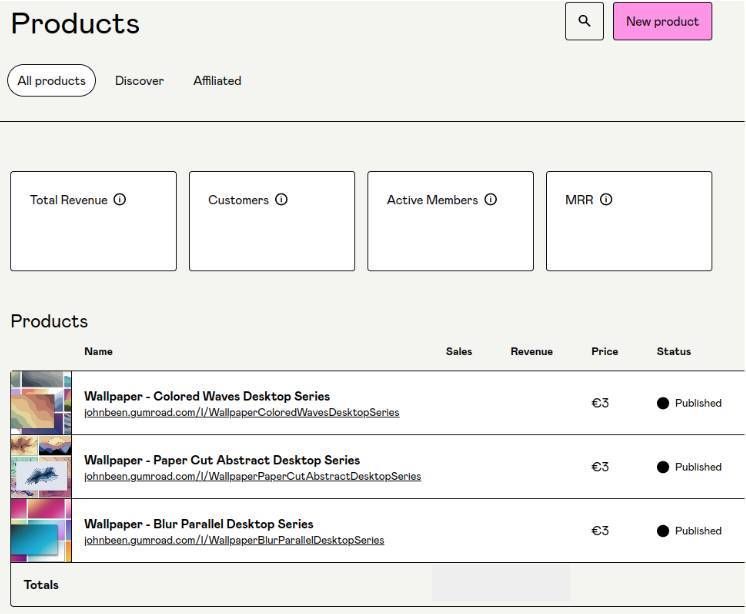
Products
In the Products section, you will see your information on Total Revenue, Customers, Active Members and your expected average monthly recurring revenue (MRR). Further, you see an overview of all your products, with the Name, Sales, Revenue, Price, and Status.
Posts
Here you can create new posts and send Email broadcasts to connect to your audience. You can schedule it and automate it.
Audience
Here you see the email address and other details of every customer that purchased one of your products. Here you also can manage your followers.
Analytics
Here you have an overview of everything related to your sales. You see the number of Sales, The number of Views, and the Total amount. You can change your view to Daily or Monthly, show only specific products, and change the period for which you want to see the metadata. You also get Referrer information and details on Locations.
Payouts
Here you see earnings information, like your Balance, Past 7 days, Past 30 days, and Total Earnings.
Discover
Here you can search for products yourself on Gumroad.
Library
Here you will find the purchases you did yourself.
How to add your first new product to Gumroad
Now it is time for the exciting part, adding your first product to Gumroad. But before we do that, it is good to be a bit prepared. I think it is wise to have the following available before you start:
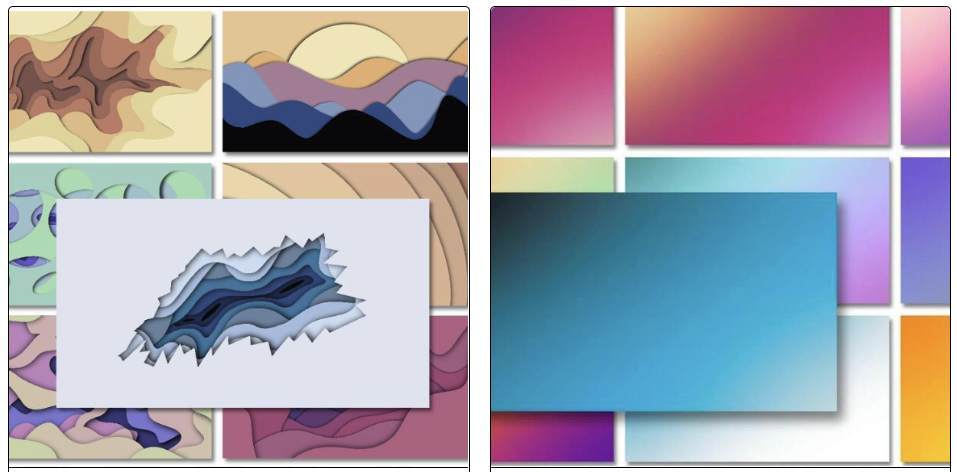
- Your product files(s) – I sell my desktop wallpapers in sets of 10, so I create a zip file containing the 10 files.
- A product overview Cover image – Here I create a nice image that shows off the product I want to sell.
- A product thumbnail square format image (600×600 pixels) – This is a large square format thumbnail of the product that you want to sell.
- A product description – Prepare a nice short description of your product that gives enough information on what the buyer will get.
- A name for your product – a clear and inviting name for your product.
1) When you have the above prepared, let’s go to Products in your Gumroad dashboard.
2) Click on the New Product button.
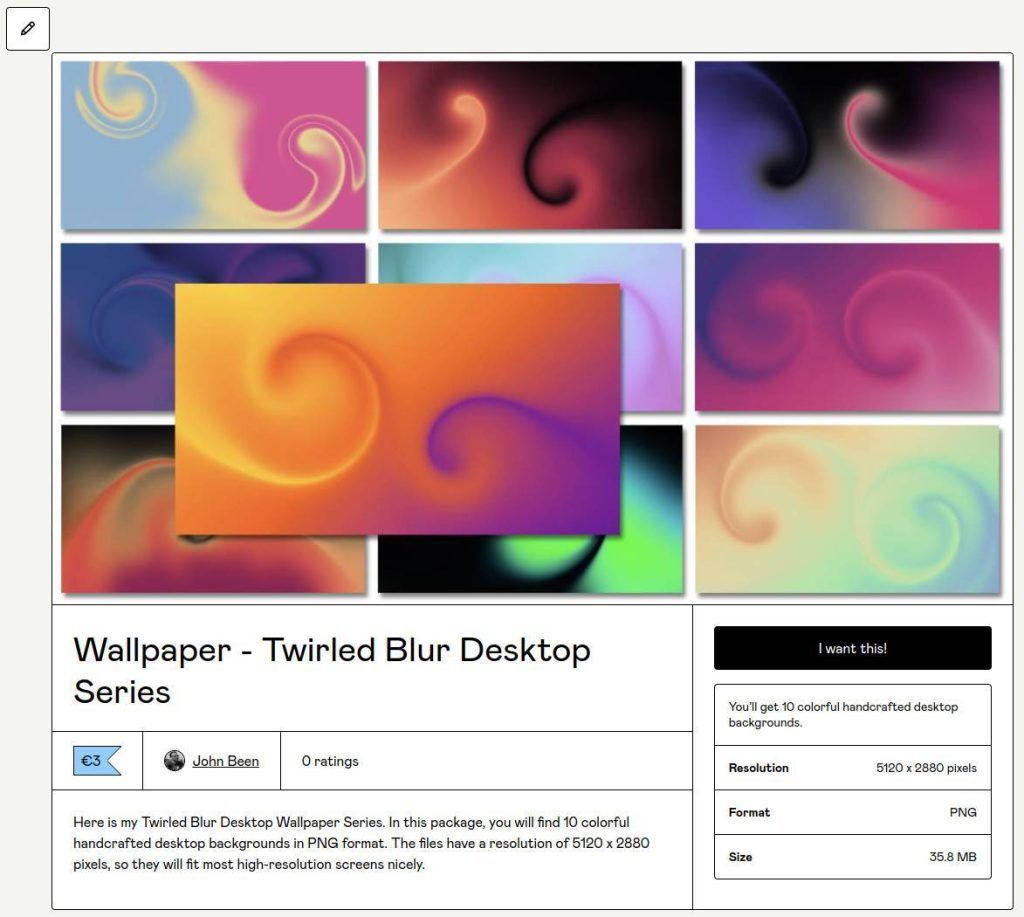
3) On this screen you type the Name of your product. In my case, the Name is “Wallpaper – Twirled Blur Desktop Series”.
4) Select the product Type. In my case, it is a Digital product.
5) Set the Currency and the Price for your product. I set it to 3 Euros.
6) When you are finished, click on Next: Customize.
Product
We start in the Product section. Now we can change the Name, add a Description, decide on the direct URL to your product, upload a Cover image, upload a Thumbnail Image, and decide on some other settings that we will discuss below. As you go you also will see these changes in the Preview section on the right.
So let’s go through the steps.
7) I will keep the Name as decided on the previous page.
8) In my description I type:
“Here is my Twirled Blur Desktop Wallpaper Series. In this package, you will find 10 colorful handcrafted desktop backgrounds in PNG format. The files have a resolution of 5120 x 2880 pixels, so they will fit most high-resolution screens nicely.”.
9) I add “WallpaperTwirledBlurDesktopSeries” to the URL.
10) In the Cover section I click on Upload images or videos. Now I can decide between Computer files, External link, or Unsplash. I choose Computer files and select my prepared product overview Cover image.

11) In the Thumbnail section I click on Upload files. Now I can decide between Computer files, or Unsplash. I choose Computer files and select my prepared product overview Cover image. This file needs to be square and at least 600 by 600 pixels.

12) In the Product info section you can change the Call to action between “I want this!”, “Buy this”, and “Pay”.
13) In Summary you give a short description of what the buyer gets. I type “You’ll get 10 colorful handcrafted desktop backgrounds.”.
14) In Additional details you can add extra details. I add:
- Resolution: 5120 x 2880 pixels
- Format: PNG
15) I leave Integrations for what it is for now.
16) In the Pricing section I leave the amount as decided before. Here you can also choose to allow customers to pay what they want.
17) Next we can offer variations of your product, like different formats, versions, etc.
18) Next we can change some extra settings, like:
- Limit product sales
- Allow customers to choose a quantity
- Publicly show the number of sales on your product page
- Generate a unique license key per sale
- Mark product as e-publication for VAT purposes
19) Click on Content.
Content
Now we are in the Content section. Here we can add extra text, images, and media, embed a Tweet, add buttons, and embed file uploads. I will keep it simple for now and only add a zip file with my 10 desktop wallpaper files.
20) Click on Embed file upload and select Computer files.
21) Select the file(s) you want to add to the Content. The file will be downloaded.
22) Click on Checkout.
Checkout
Here we can add a discount code, set up the required shipping information, and additional details for the Payment form. Here we can also change the text for the button on the Receipt and in the checkout mail, which gives access to the product the customer bought from you.
23) Keep everything as it is for now and click on Save changes. Now click on Publish and continue.
Now the product will be published on Gumroad and you will go to the Share section.
Share
Here you can share your product via Twitter or Facebook, or copy the URL so you can share it wherever you want.
24) Choose Twitter, or Facebook, or copy the URL if you like. I choose to copy the URL so I can use it in this article 😉
https://johnbeen.gumroad.com/l/WallpaperTwirledBlurDesktopSeries
25) Click on Save changes and click in the sidebar on Products.
Now you will see that your product is added to the Products page.
That’s basically it to start your journey on Gumroad.
Testing your new product
Now that you have added your new digital product to your Gumroad environment, you want to make sure that the purchase process goes well. To do this, do the following:
1) If you are still logged in to your account, go to your Products page.
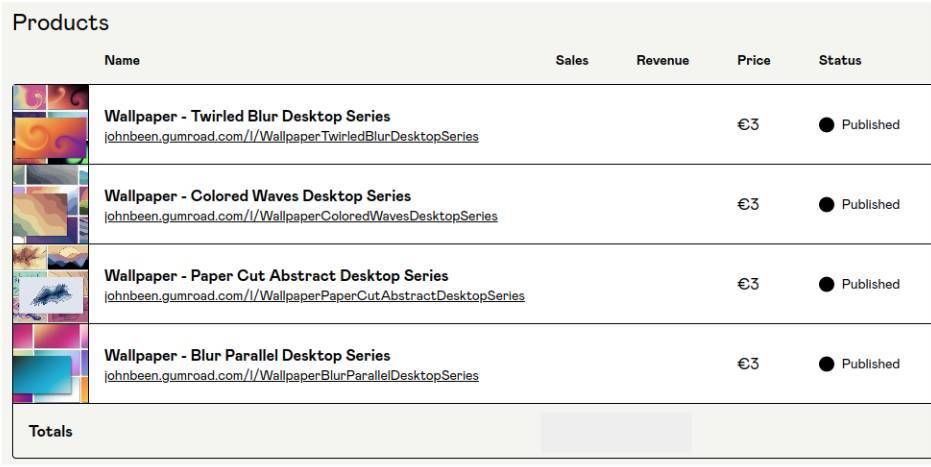
2) There you will see, as shown in the previous image, a link under the name of the product. Click that link.
Now a page is shown exactly like your customers will also see it. The only difference is that you will see an Edit button in the top left corner. This page is fully functional and makes it possible for you to make a fake purchase.
3) First check that everything looks as you envisioned, such as the image, the title, the price, the description, and the sell button.
4) Press the sell button. In my case that is the “I want this!” button.
Now the Checkout page will be opened.
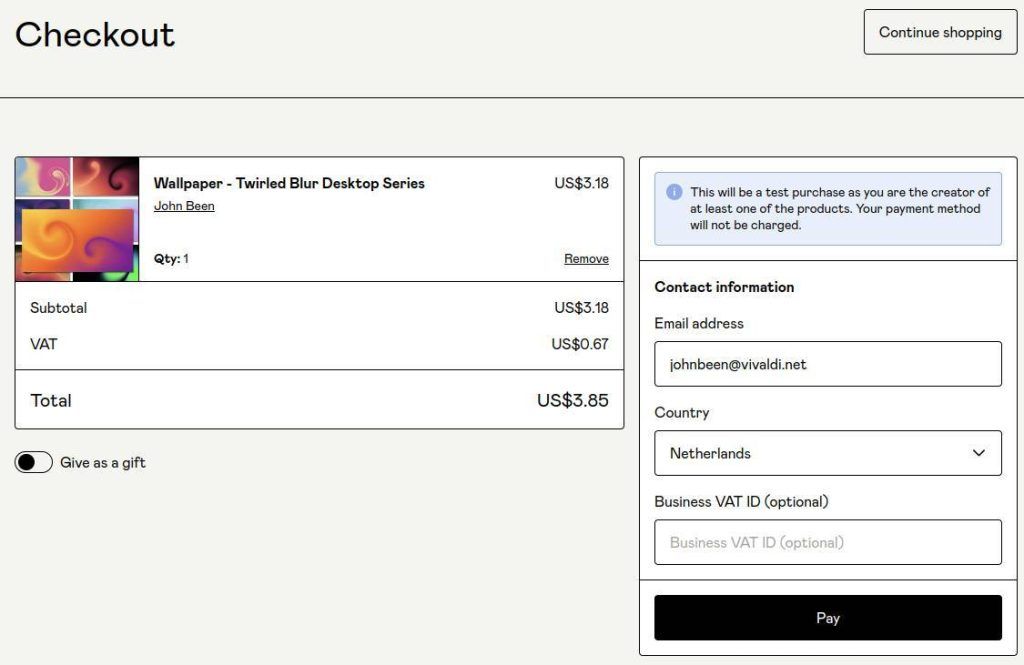
Here you see a summary of what you selected to buy, including the total price and VAT. Further, you see the Contact information. And in the blue area, you see a message saying that this will be a test purchase and the payment will not be charged.
5) Click on Pay.
Now a new page will be opened with the product that you bought, a View receipt button, a Resend receipt button, and a Download button to actually download the product you just bought.
6) Click on View receipt and check if everything looks correct.
7) Go back to the previous page and click on Download. Check your Downloads folders to see if the file is there and if it contains the product(s).
Now you are good to go.
Personalize your landing page
Of course, you were eager to directly publish your first product on Gumroad. But after that, it is also good to give some attention to your personal landing page. You can find the URL in the Profile section of your Settings. It is based on your Username. My URL looks like johnbeen.gumroad.com. When you are logged into your account and you go to that link, you will see an Edit profile button in the left top corner. Click on it to go to the Edit profile mode.
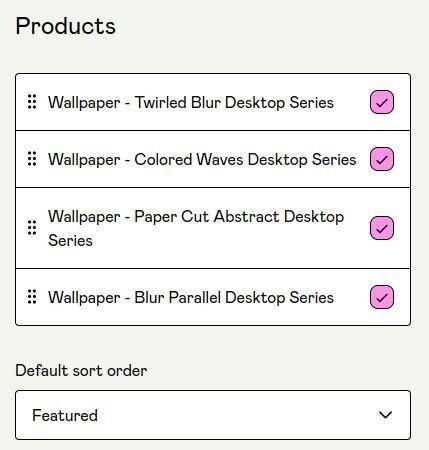
Now we are in the Profile section of the Settings, as we discussed before. Here you can change your Username, your Name, and add a short Bio. Also, you can add a logo for your Gumroad profile and product pages, or like I did a personal portrait. You can also change the highlight color so it matches your brand. Further, you can add your Twitter account, if applicable. Below that you can change the order of your products if you sell more than one. You can do this manually, or by choosing a Default sort order.
Final words
So this was an introduction to the Gumroad e-commerce selling platform. Personally, I think it’s fantastic that nowadays you can bring your products of which you are proud to the attention of a worldwide audience and you don’t have the dependencies and limitations of the classic intermediaries. People with a passion for writing books can easily offer their products. people with a passion for education can make their courses and tutorials available to their niche target group within a short period of time. People with a passion for art can share their creations with the world, where they used to not have a chance in regular galleries. It is now the customer who determines whether your creations are interesting, not the experts and their limitations. Gumroad is one of the many platforms but in my opinion very accessible, and easy to get into if you are not sure about your following and purchasing yet, as there is no monthly fee. Try it out.